|
HOW
TO: INSERT RUNNERS by: Paul Goodwin - DN 4061 This information is provided for the use of sailors who wish to build their own insert runners. Over the last few seasons a lot has been learned about what it takes to assemble an insert runner which can stand up to all ice and wind conditions. The construction described here is not the only acceptable design, but is easy to build and will give good results. The basic design is for a 36" long runner with a 1/4" thick blade. The changes required to accommodate thinner steel and/or shorter runners should be obvious. BLADE
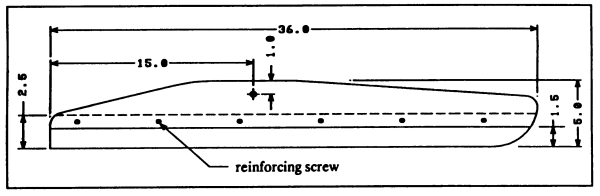
DESIGN Many materials are available to the builder for this type of runner. Recommendations for specific blade materials will not be made, since this information has been covered in other newsletters. Blade shape In order to determine what shape the blade should have, make a full-scale drawing of the complete runner (fig. l). A good starting point is to use the same nose and tail contour as used on the Sarns bull-nose runner. I prefer the appearance of a runner body which drops in height from the
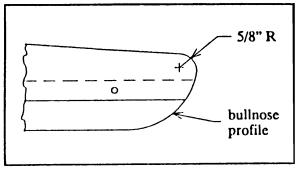
fig.1 COMPLETE RUNNER chock to the nose (about 1"), and from the chock to the tail (about 2"). Don't forget about the 5/8" minimum radius on the front of the runner (see fig.2). Once the overall shape is drawn, add two lines to the drawing, one at 1-1/2" from the bottom and the other at the same height as the width of the blade material (2-1/2" to 3"). This drawing now shows the outline of the steel blade and the wood body. This is important since once the steel is hardened it will be difficult to change its shape.
Finishing Spring steels are often purchased hot-rolled, which bas a rough surface. If the hot-rolled steel also has scale on it, sand blasting is required before it can be heat-treated. Most other types of steel are usually purchased either precision ground or cold-rolled, both of which have a smooth clean surface. Steel that is already ground to the final thickness must be heat treated in a controlled environment so that no scale is formed on the surface. Steel that is thicker than desired should be ground to thickness after hardening. This final grind will help remove any warping. Blades can be flame hardened which allows holes to be drilled and modifications to be made in the unhardened areas. Most other types of heat treating harden the entire blade, so be sure to complete all of the desired machining before hardening. WOOD
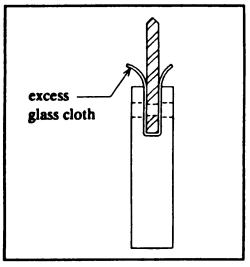
BODY Material The type of wood used for making runner bodies must have several properties in order to be successful. The wood must be hard in order to keep it from being dented by the chocks (this will make the runners loose), it must glue well with epoxy, and it must be resistant to splitting. If a chart of wood properties is available, look for wood that has high hardness perpendicular to the grain, and high tensile strength perpendicular to the grain. White ash and hard rock maple are good choices. The issue of gluing is more difficult. Two woods that I know of which can be difficult to glue are oak and teak, and I'm sure there are others. The body may be one piece of wood, or may be laminated butcher-block fashion. The laminated body will be less likely to warp. Body shape Start with a piece of wood (for each runner) which is 36" long, 7/8" thick, and 3-1/2" high. Cut a slot in the bottom edge for the steel insert. The dimensions for the slot will be determined by the size of the steel. The depth of the slot should allow 1-1/2" of tile blade to be exposed. Cutting the slot is best done on a table saw, adjusting the rip fence by trial and error to get the right width. Place three thicknesses of 8 oz. or 10 oz. glass cloth over the blade and try to insert it into the body. The perfect fit will allow the glass cloth and steel to slide in snugly without putting too much strain on the wood. Using the steel blade as a template, mark the location of the reinforcing screw holes on the side of the body. Drill these holes out to 5/16" diameter. Using the runner drawing cut the body to the desired outline. Trial fit the blade into the body to insure that everything lines up properly. The runner is now ready for final assembly. ASSEMBLING
THE RUNNER If the slot in the body is the correct width, the steel insert will be self-aligning when it is glued in. If the fit is too loose, consider adding another layer of glass cloth to adjust the fit. Support the body with the slot facing up. On a flat surface, spread out a sheet of plastic to wet the glass cloth on (a garbage bag works well for this). Cut three pieces of glass cloth (for each runner) 38" long and 5" wide. Coat the inside of the slot with epoxy. Wet out a layer of glass cloth on the plastic. Add another layer of glass on top of the first, wet it out, and repeat for the third layer. Coat the steel insert with epoxy (where it will be glued into the wood) and sand with 80 grit sandpaper. This is similar to wet sanding, but with epoxy instead of water.
Once the assembly has reached a full cure, drill out the reinforcing screw holes with a 1/4" drill. Cut pieces of 1/4" threaded rod to the width of the body. Put tape over the holes on one side of the runner body and fill the holes with epoxy. Coat the pieces of rod with epoxy and drop them into the holes. Wipe off any excess epoxy and allow to cure. FINISHING
THE RUNNER Sand the body to its final shape and round off all edges except the bottom. The body should be reinforced by adding layers of fiberglass to the sides. If the top edge of the body is rounded, then the glass cloth can he wrapped over the top and down both sides, laminate the layers of cloth one at a time, being careful to squeegee the cloth well in between layers. Allow each layer to cure and sand lightly to remove any bumps and irregularities. Measure the overall thickness and add more layers of cloth to build up the thickness to 1". A layer of carbon fiber can he added with the fiberglass for additional strength and stiffness, but is not required. Drill the 3/8" pivot hole 15" from the back of the runner and 1" from the top. Coat the inside of the pivot hole with epoxy. After curing, carefully drill out the hole to 3/8' again. Sand the runner smooth with 80 grit sandpaper and apply a final coat of epoxy. Many sailors add stiffeners to their insert runners. This can be done several different ways. Stiffeners can be made of aluminum angle, but they must be bolted very tightly to the runner to be effective. A wooden "wing" with carbon fiber glued to the outside edge also makes a good stiffener. A stiffener might make the runner faster by keeping it from bending under load, and also adds strength. The runner is now complete except for sharpening the edge. Henry Bossett's article in the last newsletter outlined a good method for measuring the crown on runners. The epoxy coat will hold up fine for several years, but an additional coat of varnish or paint will give a more durable finish. Many people have had problems with runner bodies breaking (usually just above the top of the blade). The reinforcing screws and the layers of glass cloth should provide adequate strengthening of the body. I have a set of runners built as described in these plans and have sailed them hard for three seasons. So far there are no signs of any problems. Other sailors in my region have runners of similar construction, and I’m not aware of any failures. Most people that have made insert runners were surprised at how easy they are to assemble. I hope this has provided some useful information and the inspiration to start building. |